

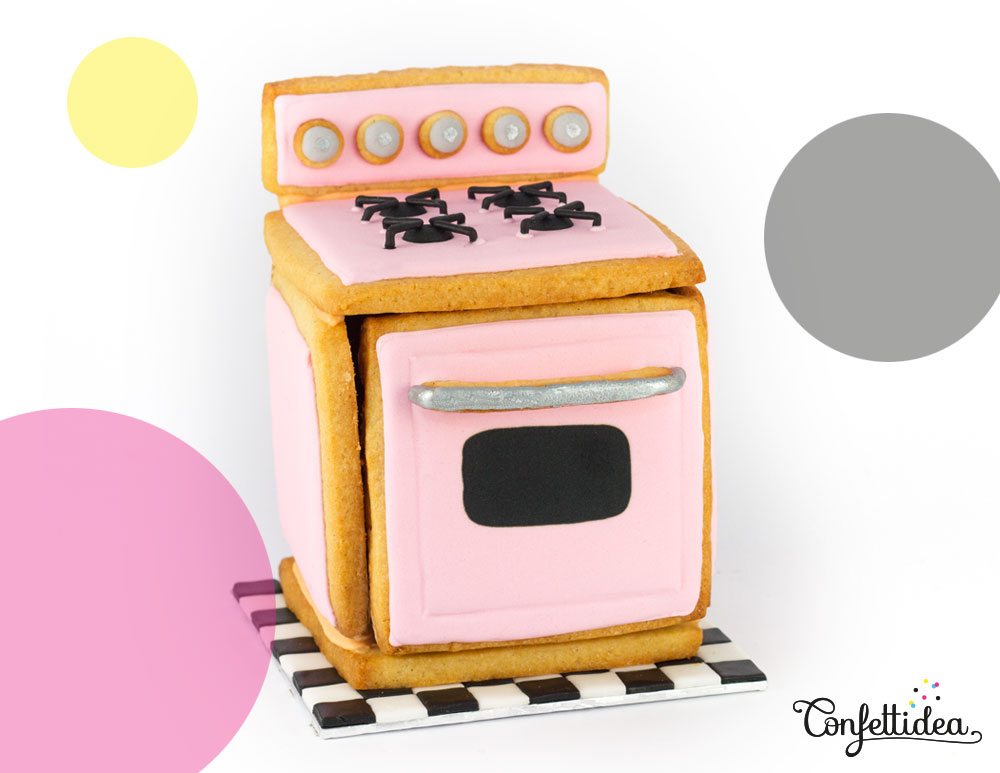
My Vintage Cookies Oven Tutorial
For my Mom’s birthday, I baked a little vintage oven. And as she really likes cookies, I filled the cookies oven with mini cookies.

I thought to take photos of the different steps of making this mini oven. I let you discover below the tutorial and I hope this project will inspire you to create your very own vintage oven.
Step 1: Prepare and Bake Cookies
We started by creating the different shapes of cookies:

Step 2: Make the Royal Icing

- Put 3/8 cup (90ml) of water with 3 tablespoon of meringue powder in the bowl of a standing mixer and mix for about 30 seconds.
- Add 1/2 teaspoon cream of tartar and mix for about 30 seconds.

- Add 1 teaspoon corn syrup (optional) and mix for about 30 seconds.
- Add 500g icing sugar.

- Mix on medium speed for about 10 minutes.
- Here is your royal icing. 🙂

- You can color your royal icing using food coloring gel or paste.
-
(place your royal icing into the container, cover it with clingfilm and closes airtight container).
- Fill piping bags or keep your royal icing in an airtight container (place the royal icing into the container, cover it with clingfilm and close the airtight container).
You can keep your royal icing for about 1 week. After 2-3 days the water begins to separate from sugar, so it’s necessary to mix the royal icing again before using it.
Step 3: Prepare Cake Card
Now we have cookies and colored royal icing (pink, grey, black, peach and white). Let’s get started and prepare the tiling effect cake card:

- Cut small black and white squares and assemble them on the cake card by sticking them with corn syrup.
- You don’t need to do the tiling all over the cake card because it will be cover with a cookie. (see picture below).

Step 4: Cover Cookies with Royal Icing

- Mark the outline of the cookies with pink royal icing. For the oven door cookie, make a rectangle in the center.
- Fill the cookies with royal icing.

- Put the oven handle in pink royal icing. The icing will dry and the handle will hold.
- Once the pink icing is completely dry, fill the center with black royal icing.

- Cover the rectangle cookie with pink royal icing. And cover the 5 rounds with grey royal icing.
- Put the rounds on the pink rectangle.

- Cover the handle with grey icing and let dry.
- Once dry, painted the icing ont he handle with edible silver metallic paint. Let dry.
Step 5: Assemble Cookies

- To attach the first wall of the oven, pipe a line of peach royal icing on the bottom cookie and lay the cookie in place.
- Attach the two other walls of the oven using the same way. Add royal icing between each cookies to make them hold together. Place objects around cookies for drying.

- Attach the top of the oven with royal icing and let dry.
- Attach the rectangle on the back and let dry in place.
Step 6: Burners

- Mark four circles with the help of a mini round cookie cutter.
- Fill the round marks with black royal icing. Let dry.

- Roll a sausage with black sugarpaste. Create a form of “L”.
- This “L” will be use in steps 5 and 6 to create the burners. You need to create 16 “L”.

- Put a little bit of pink royal icing on the “L” and place them around the black rounds.
- Let dry.
Step 7: Mini Cookies

- Cut croissants and biscuits shapes in a roll out sugarpaste and stick them on cookies with the help of corn syrup.
- Fill the oven with mini cookies and close it with the door.
If you want to add a small perfect detail that will make a big effect, you can create an horizontal bar on the side of the oven and suspend a tea towel. All of this in gumpaste.
This tutorial is over. I hope you like it. Anyway, my mom loved it and ate all the cookies 😉
Tags: cookies, oven, valentine, valentine's day, vintage
